Flux and Node
Hello people, You will need to know about Flux soon or later,
It’s been a while didn’t post any news.
Let me share with you how to earn extran income with Flux.
Actually flux probably almost same like ethereum only it also has POS, so it actually can be mine also can be stake.
The rewards is split between POW(mining part) and POS(staking part).
let’s just get started.
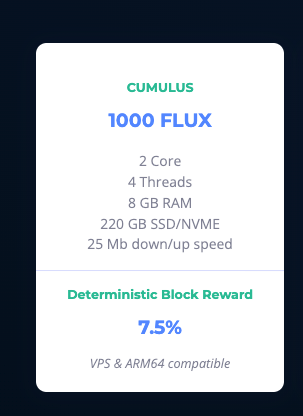
Flux Node Cumulus
- setup zelcore wallet
- rent VPS or if your home internet environment is strong enough to handle requirements below, then maybe a pi4 8gb device would be enough.

- Setup VPS / device
- Maintenance
Setup Zelcore wallet
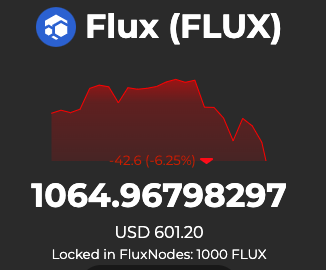
- you will need to buy or mine 1000 Flux to your zelcore wallet
- after you received 1000 flux on your wallet, try to send it again to your own address 1000 flux.
- it will automatically locked, it will be like this, refer to picture.
 Now your zelcore app is ready to handle flux node.
Special for rapsberry pi4 8gb before start Setup Flux
Skip this section if you are using VPS
Install the linux 20.04 LTS
after login type sudo su -
do apt-get uprade and reboot
If you use ssd or nvme. you need to first mount your SSD or nvme. I recommend you to use NVME extension on rapsberry as it is more stable and faster.
so first you need to mount it, do this on your terminal(using linux or mac):
fdisk -lto check your storage- usually you will see your extension storage on here
dev/sdadepends on how many you have - in this case, mine was at
dev/sdaso typesudo parted /dev/sda - next command type
mklabel GPT - next command type
mkpart primary 2048s 100% - next command type
qto quit - type
mkfs.ext4 /dev/sda1, about/dev/sda1name, it depends on your storage, you can check againfdisk -lto make sure. - it will question yes or no. ofcourse select
y - try to create directory to mount your storage, like
mkdir flux-ssd, you can mount it bymount /dev/sda1 /flux-ssd
you will need to do this again if your device restart, so in order to auto-mount it, you need to edit fstab file.
- run
blkid /dev/sda1 - copy the
UUID - run
vi /etc/fstab - go to last line and type
ito write text there - write like below
UUID=your-copied-uuid-previously /flux-ssd ext4 defaults,noatime 0 2
- after finish, type
escand:wqto write and quit
notes:
you need to be root
to test, you can try to reboot and check inside the folder again, if there is lost+found file, then congratulation, you already successfully auto-mount it.
Setup VPS / Device
First you need to login or access your device.
- Go to copy this magic script so you don’t need to handle comman 1 by 1.
- copy the command
bash -i <(curl -s https://raw.githubusercontent.com/RunOnFlux/fluxnode-multitool/master/multitoolbox.sh) - choose number 1 to install docker, it doesn’t matter if you already have docker, just run number 1.
- and run number 2 For more details, you can see the video
- You will be asked a few questions on the script, all the question answer is on your zelcore app, you can find it on your
FluxNodesection. - your Zelcore ID located in
Apps->Zel ID - wait until all synchronized and benchmarked
- you will see your dedicated ip address with spesific port to access your flux node at the end of script
- copy the ip address and access it on web
- double check if benchmarks is finished, go to web and select section
Benchmarkand get benchmark status, it should displayedCUMULUSif not probably your device has not meet requirements for running node yet, please check again the requirements, or there are some cases that your node still on going benchmark. - if you check all correctly and in zelcore app also
StatusisCONFIRMED, now you can hit the startFluxNodebutton to start your node.
Congratulation!!, your node CUMULUS is successfully deployed and started to earn passive income.
Notes:
If you start node without check benchmark status, if it still on going to benchmarked or failed, you will get status DOS, which means you need to restart over again, by delete your node and lock flux 1000 again(repeat steps on Setup Zelcore Wallet)
Maintenance
to become node operator, you will need to do this at least once a week.
- check in web gui, Flux Admin
- Update Flux if necessary
- Update Daemon if necessary
if no notification or action needed then you are still good to go.
DISCLAIMER
This is not a financial advice just purely a tutorial or a knowledge share. so if you decide to buy the asset of flux, please DYOR it first before invest.
Conclusion
So its very easy to setup flux node these days. previously it was very tedious to run spesific command 1 by 1. now we have already magic script :)
My earning in 1 weeks was not so bad actually, it already trigger rewards for cumulus which is 5.6 Flux total. I think it depends on device, which mean if many CUMULUS node born, then your speed to earning would be slow.
Alright, i hope this materials is usefull for you. I am sorry if there are things not clear, please do let me know, It is my pleasure to share this interesting passive income to all of you.
And see you on the next chapter of curcifer tech channel techies.